
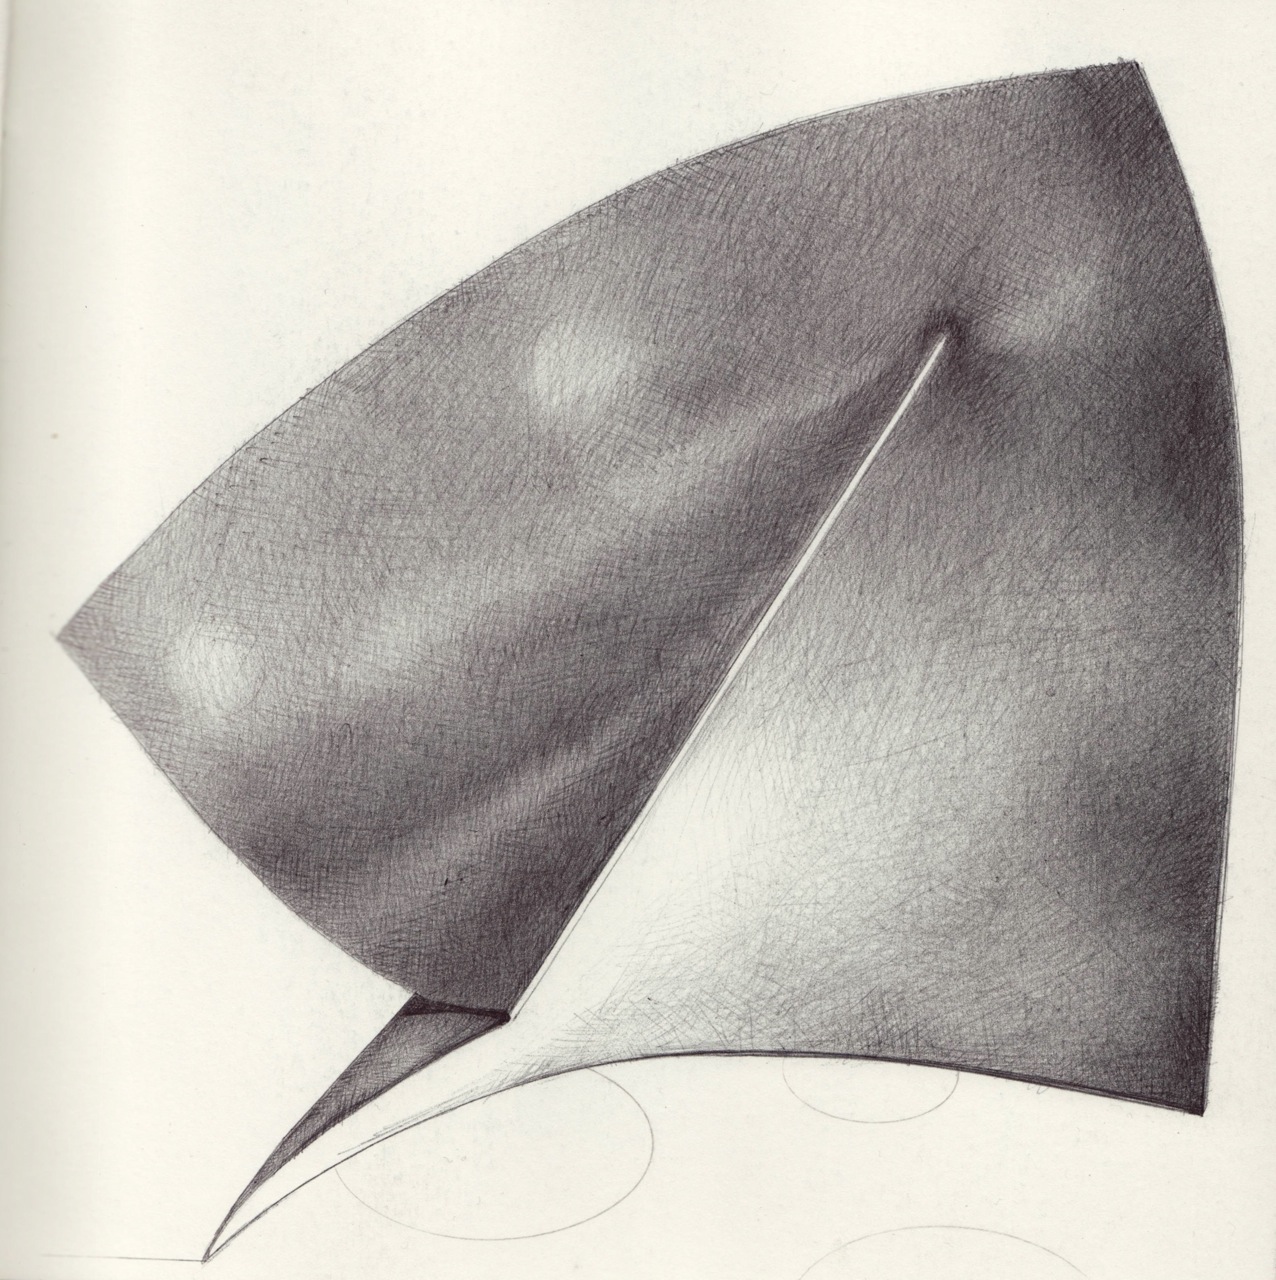
 |
| Final ballpoint rendering of folded paper page. white blotches are gaps left for perforated circles - see small image below. |
 |
| 1st phase ballpoint pen drawing of paper page. |
This post explores the
integration of my passion for drawing and my quest to create and authentic
artists book. Featured on this post is a step-by-step account of rendering a folded paper page as part of my reference and conceptual development for an artists book. New ways of seeing, illustrating and exploring the codex of the book (as art product) - a continuation of my theme; celebrating the handmade in a digital age.
 |
| 2nd phase of ballpoint pen drawing of folder paper page. pencilled circles will be perforated to reveal images on the next page. |
Introduction
I teach drawing to Jewellery
students, mainly to use drawing as a tool in the design, development and
manufacture of products. Thinking through drawing in the development of a
concept, the design development of a chosen idea (applying the design
principals) and the realization of the final jewellery pieces in technical
drawings as well as presentation renderings. However it is at the foundation
level (at first year) that students are introduced to the basics of drawing
(before designing), observing and rendering from life, organic objects as well
as mechanical and manmade objects.

One of the exercises (learning activities)
introduced during the foundation program is to facilitate the transfer of
skills associated with the rendering of a broad spectrum of tonal values in the
modeling of complex forms and shapes.

The project brief introduces students to
the art folding paper, especially the book by Paul Jackson – Folding Techniques for Designers From Sheet to Form. Follow the link provided pleat
farm to access a review of this amazing design tool, complete with images and
supporting text.


Paul Jackson has been a professional paper folder and paper artist since 1982 and is the author of 30 books on paper arts and crafts. He has taught the techniques of folding on more than 150 university-level design courses in the UK, Germany, Belgium, the US, Canada and Israel. These include courses in Architecture, Graphic Design, Fashion Design, Textile Design, Jewellery, Product Design, Packaging, Ceramics, Industrial Design, Fine Art, Basic Design and Interior Design. He has also taught many workshops in museums, arts centers and festivals and has worked as a folding consultant for companies such as Nike and Siemens. As cited at pleat farm, an amazing site that explores pleating in all forms, shapes and sizes across all disciplines - especially architecture, fashion and lighting and furniture.
 |
| 4th phase |

The
learning activity (project brief) encourages students to design and construct a
paper prototype in a variety of sizes and then to render the product exploring
a variety of drawing materials including pencils and ballpoint pens
(demonstrated here). They have to render the planar forms and shapes accurately
before they apply the broad spectrum of available tonal values - to capture the
folded paper product – from light to dark (depending the strength of the light
source).

The exercise introduced students to modeling simple forms and shapes
(planar constructions) before embarking on more difficult organic forms and
shapes. Planar constructed paper product makes for interesting drawing
exercises when light from a light source is cast on the product – the variation
of tonal values is immense and presents a significant learning challenge for
foundation drawing students.

My intent was to explore the book’s pages, both as perforated and rendered, integrating the art of drawing, sculpting in paper and printing. For my first exercise I chose a paper folded prototype that is simple to render and relates to the size of my pages, creating the illusion that the actual page has been altered, folded to resemble an origami product. I started the drawing by rendering its form and shape to scale (outlines). Then step-by-step I modeled the planes, starting with the darkest areas, working towards the lightest planes – as featured here on this post.

The right pen - It is vital that you select
a ballpoint pen that does not dispose of its ink to freely - creating ink
blotches on the paper that can spoil the overall quality of the rendering,
especially when illustrating such a simple product as illustrated here on this
post. I work mainly with the fine Big pens – asking the manager of a stationery
shop if I could test all the pens and select the best of the bunch. I recommend
that you present your drawing book to the store manager (gain their support) before
embarking on testing all the pens in the store.
They normally marvel at my work - making the task of asking that much
easier.
Another
important point is drawing on a small scale to be in a position to turn the book or separate pages to
master the art of cross hatching when modeling the forms and shapes (shadows).
I
also recommend that you use a heavier
paper, a 150 -250 grams. This allows the drawing to breath as mentioned on
a previous post. It is also possible to them build up layers of ink – very much
like burnishing a clay pot (ceramic product). It is almost impossible to overdo
the amount of ink on good quality paper. It will always reduce to lines when
enlarged using a Photostatting machine or when scanned and altered
digitally.
|
| Final phase before cutting out the circles - perforated circles to reveal the images on the next page. |


